1.3.4. Edge Data Broker enabler
1.3.4.1. Introduction
The Edge Data Broker enables the efficient management of data demand and data supply among edge nodes based on a publish/subscribe schema, taking account load balancing criteria. This enabler distributes data where it is needed for application, services and further analysis while considered essential only in those deployments that involve IoT architectures. Below is a high-level diagram of the Edge data broker.
EDB Enabler reaches at the end of the ASSIST-IoT project TRL6.
1.3.4.2. Features
The Edge Data Broker enabler has the following operational and intelligent functionalities:
Subscriptions and messages between Edge Devices through the Edge Data Broker enabler
Management and distribution of messages using delivery mechanisms
Common interfaces for filtering messages
Integration with other data brokers if needed
1.3.4.3. Place in architecture
The Edge Data Broker enabler is part of the Data Management Plane of ASSIST-IoT. The Data Management plane encompasses any process, in which data is processed to deliver features concerning data interoperability, annotation, security, acquisition, provenance, aggregation, fusion, etc. This enabler provides a data communication channel to all IoT devices.
1.3.4.4. User guide
1.3.4.4.1. To connect to Edge data broker use MQTT Clients:
The Edge Data Broker is an distributed MQTT Broker and follows the MQTT specification. As such in theory any MQTT compliant library can be used to connect, subscribe and publish messages to the Edge Data Broker.Here we provide an example using python.
This is a subscriber python script that uses the paho-mqtt library to connect to the Edge Data Broker, subscribe to a topic and receive and print messages from it.
import paho.mqtt.client as mqtt

broker= "127.0.0.1"
port  = 31883
topic = "assist.test"

# The callback for when the client receives a CONNACK response from the server.
def on_connect(client, userdata, rc, test):
    print("Connected with result code "+str(rc))
    # Subscribing in on_connect() means that if we lose the connection and
    # reconnect then subscriptions will be renewed.
    client.subscribe(topic)

# The callback for when a PUBLISH message is received from the server.
def on_message(client, userdata, msg):
    print(msg.topic+" "+str(msg.payload))

client = mqtt.Client()
client.on_connect = on_connect
client.on_message = on_message

client.connect(broker, port, 60)

# Blocking call that processes network traffic, dispatches callbacks and
# handles reconnecting.
# Other loop*() functions are available that give a threaded interface and a
# manual interface.
client.loop_forever()
This is a publisher python script that uses the paho-mqtt library to connect to the Edge Data Broker, subscribe to a topic and publishes messages to it.
import paho.mqtt.client as paho
import json, time

broker= "127.0.0.1"
port  = 31883
topic = "assist.test"

# The callback for when the client receives a CONNACK response from the server.
def on_connect(client, userdata, rc, test):
    print("Connected with result code "+str(rc))

def on_publish(client,userdata,result):                    # create function for callback
    print("data published!")
    pass

client1= paho.Client("control1")                           # create client object
client1.on_publish = on_publish                            # assign function to callback
client1.on_connect = on_connect
client1.connect(broker,port)                               # establish connection
print("Connected to MQTT")
body = {}
body["name"] = "DeviceName"
body["raw-data"] = 1.000

i = 0
while i < 1000 :
    body["raw-data"] = float(i)
    bodyS = json.dumps(body)
    print("Publishig data: " + bodyS)
    ret= client1.publish(topic, bodyS)               # publish
    i += 1
    time.sleep(0.1)
Executing those two scripts will produce and consume json messages to the Edge Data Broker. The scripts can be found here.
1.3.4.4.2. To monitor Edge Data Broker Enabler, type to your browser:
http://<IP>:<NodePort>/status to get EDBE’s status page.
http://<IP>:<NodePort>/metrics to get EDBE’s metrics page made for Performance and Usage Diagnosis Enabler’s consumption.
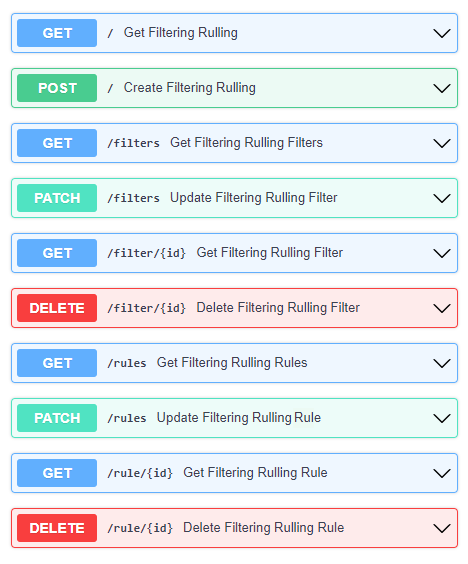
1.3.4.4.3. To access Filtering and Ruling Script’s API type to your browser:
http://<IP>:<NodePort>/docs and fr-script’s Swagger page will open up, where you can fetch, post, update and delete filters and rules.
For more info regarding FR-Script’s usage please check FR-Script’s Documentation in Developers guide section.
1.3.4.4.4. To use MQTT-Explorer:
NOTE: MQTT-Explorer works for Ubuntu x64 architectures and not for ARM. When deploying EDBE in ARM architectures, set the parameter mqttexplorer.enabled=false.
Set the parameter
service.ports.ws.enabled=trueAdd as environmental variable the following:
DOCKER_VERNEMQ_LISTENER__WS__DEFAULT: "0.0.0.0:9001"
Type to your browser
http://<IP>:<NodePort>/Insert the correct
NodePortin the Port field,mqttin Basepath filed and press CONNECT.If
DOCKER_VERNEMQ_ALLOW_ANONYMOUS: "off"in EDBE’s Vernemq environmental variables, also insertUsername,Passwordin the corresponding fields and change theClient IDin the ADVANCED options.
1.3.4.5. Prerequisites
The Edge Data Broker enabler is designed to be executed on a cluster of devices on ARM64 architecture. It can be executed of course on a x64 architecture as well by changing the docker images.
Kubernetes 1.16+
Helm 3+
1.3.4.6. Installation
1.3.4.6.1. Edge Data Broker (EDB) Enabler Installation
To install the chart with the release name edbe for Ubuntu Architectures:
helm repo add assist-public-repo https://gitlab.assist-iot.eu/api/v4/projects/85/packages/helm/stable
helm install edbe assist-public-repo/edgedatabrokerx64
To install the chart with the release name edbe for ARM Architectures:
helm repo add assist-public-repo https://gitlab.assist-iot.eu/api/v4/projects/85/packages/helm/stable
helm install edbe assist-public-repo/edgedatabrokerarm
Else you can also clone https://github.com/assist-iot/edge_data_broker repo to your machine and install Edge Data Broker Enabler.
helm install edbe ./edgedatabroker
The command deploys EDB on the Kubernetes cluster in the default configuration.
To check if the installation was successful run:
kubectl get pods
The result should show something like:
NAME                                               READY   STATUS    RESTARTS   AGE
edbe-edgedatabroker-frscript-6468497fbf-c72dt      1/1     Running   0          2m58s
edbe-edgedatabroker-mqttexplorer-69659d465-q6ff2   1/1     Running   0          2m58s
edbe-edgedatabroker-vernemq-0                      1/1     Running   0          2m58s
edbe-edgedatabroker-vernemq-1                      1/1     Running   0          2m56s
1.3.4.6.2. Edge Data Broker works for both Ubuntu x64 and ARM architectures.
Use gitlab.assist-iot.eu:5050/enablers-registry/public/edb/vernemq-arm and gitlab.assist-iot.eu:5050/enablers-registry/public/edb/frscript-arm images for deploying EDBE in ARM architectures.
Note: Disable mqttexplorer when deploying EDBE in ARM architectures.
Use erlio/docker-vernemq (official vernemq image) and gitlab.assist-iot.eu:5050/enablers-registry/public/edb/frscript-ubuntu images for deploying EDBE in Ubuntu x64 architectures.
Note: Add DOCKER_VERNEMQ_ACCEPT_EULA: "yes" as an environmental variable when using the official vernemq image.
1.3.4.7. Configuration options
1.3.4.7.1. SSL Configuration for secure communication (Enable MQTTS).
Accepting SSL connections on port 8883:
Set the parameter service.ports.mqtts.enabled=true
Create secret resource using existing certificates using the key and crt files, you can create a secret. Kubernetes stores these files as a base64 string, so the first step is to encode them.
$ cat ca.crt| base64
LS0tLS1CRUdJTiBDRVJUSUZJQ...CBDRVJUSUZJQ0FURS0tLS0t
$ cat tls.crt | base64
LS0tLS1CRUdJTiBDRVJUSUZJQ...gQ0VSVElGSUNBVEUtLS0tLQo=
$ cat tls.key | base64
LS0tLS1CRUdJTiBSU0EgUFJJV...gUFJJVkFURSBLRVktLS0tLQo=
Use
vernemq-certificates-secret.yamlto create the secret resource by updating the data values.
apiVersion: v1
kind: Secret
metadata:
  name: vernemq-certificates-secret
  namespace: default
type: kubernetes.io/tls
data:
  ca.crt:LS0tLS1CRUdJTiBDRVJUSUZJQ...CBDRVJUSUZJQ0FURS0tLS0t
  tls.crt:LS0tLS1CRUdJTiBDRVJUSUZJQ...gQ0VSVElGSUNBVEUtLS0tLQo=
  tls.key:LS0tLS1CRUdJTiBSU0EgUFJJV...gUFJJVkFURSBLRVktLS0tLQo=
kubectl apply -f vernemq-certificates-secret.yaml
The result should show something like: secret "vernemq-certificates-secret" created
Mount the certificate secret inside the EDBE’s Vernemq values.
...
secretMounts:
  - name: vernemq-certificates
    secretName: vernemq-certificates-secret
    path: /etc/ssl/vernemq
...
Add as environmental variables the following:
DOCKER_VERNEMQ_LISTENER__SSL__CAFILE: "/etc/ssl/vernemq/tls.crt"
DOCKER_VERNEMQ_LISTENER__SSL__CERTFILE: "/etc/ssl/vernemq/tls.crt"
DOCKER_VERNEMQ_LISTENER__SSL__KEYFILE: "/etc/ssl/vernemq/tls.key"
DOCKER_VERNEMQ_LISTENER__SSL__DEFAULT: "0.0.0.0:8883"
For more info regarding self-signed certificates please check self-signed-certificates.md.
1.3.4.7.2. To use fr-script over SSL:
Mount the certificate secret inside EDBE’s FR-Script values.
...
secretMounts:
  - name: vernemq-certificates
    secretName: vernemq-certificates-secret
    path: /etc/ssl/frscript
...
Add as environmental variables the following:
VERNEMQ_PORT: "8883"
FR_SCRIPT_SSL_ENABLED: "True"
1.3.4.7.3. To enable client-id, username and password for fr-script add as environmental variables the following:
FR_SCRIPT_CLIENT_ID: "<client-id>"
FR_SCRIPT_USERNAME: "<username>"
FR_SCRIPT_PASSWORD: "<password>"
1.3.4.7.5. To make the two VerneMQ nodes (edbe-0, edbe-1) run as a singular cluster, you’ll need to join one node to the other like this:
Connect to a shell of a running container within Kubernetes pod (edbe-0 or edbe-1).
kubectl exec -it edbe-edgedatabroker-vernemq-0 -- /bin/bash
Check the cluster state (you should see a 1 node cluster):
vmq-admin cluster show
The result should show something like:
+--------------------+---------+
| Node               | Running |
+--------------------+---------+
| VerneMQ@10.1.6.252 | true    |
+--------------------+---------+
Join one node to the other with:
vmq-admin cluster join discovery-node=<OtherClusterNode>
Check the cluster state (you should see a 2 node cluster):
vmq-admin cluster show
The result should show something like:
+--------------------+---------+
| Node               | Running |
+--------------------+---------+
| VerneMQ@10.1.7.1   | true    |
+--------------------+---------+
| VerneMQ@10.1.6.252 | true    |
+--------------------+---------+
1.3.4.7.6. Create an MQTT bridge so Edge Data Broker Enabler can interface with other brokers (and itself).
Add as environmental variables the following:
DOCKER_VERNEMQ_PLUGINS__VMQ_BRIDGE: "on"
DOCKER_VERNEMQ_VMQ_BRIDGE__TCP__BR0: "<IP>:<PORT>"
DOCKER_VERNEMQ_VMQ_BRIDGE__TCP__BR0__TOPIC__1: "* in"
DOCKER_VERNEMQ_VMQ_BRIDGE__TCP__BR0__TOPIC__# Define the topics the bridge should incorporate in its local topic tree (by subscribing to the remote), or the topics it should export to the remote broker. The configuration syntax is:
topic [[ out | in | both ] qos-level]
topic defines a topic pattern that is shared between the two brokers. Any topics matching the pattern (which may include wildcards) are shared. The second parameter defines the direction that the messages will be shared in, so it is possible to import messages from a remote broker using in, export messages to a remote broker using out or share messages in both directions. If this parameter is not defined, VerneMQ defaults to out. The QoS level defines the publish/subscribe QoS level used for this topic and defaults to 0. NOTE: Currently the # wildcard is treated as a comment from the configuration parser, please use * instead.
Connect to a shell of a running container within Kubernetes pod.
kubectl exec -it edbe-0 -- /bin/bash
Check the bridges state:
vmq-admin bridge show
The result should show something like:
+------+-----------------+-------------+------------+---------------------+--------------------------+
| name | endpoint        | buffer size | buffer max | buffer dropped msgs | MQTT process mailbox len |
+------+-----------------+-------------+------------+---------------------+--------------------------+
| br0  | 10.42.0.1:31094 | 0           | 0          | 0                   | 0                        |
+------+-----------------+-------------+------------+---------------------+--------------------------+
The following table lists the configurable parameters of the chart and their default values.
Parameter |
Description |
Default |
|---|---|---|
nameOverride |
string to partially override enabler.fullname template |
|
fullnameOverride |
string to fully override enabler.fullname template |
|
enablerNodeSelector |
Deploy all the components in specific K8s node(s) |
|
globalService |
container image repository |
|
vernemq.enabled |
whether vernemq component is enabled |
|
vernemq.tier |
vernemq’s tier |
|
vernemq.replicaCount |
vernemq’s number of replicas |
|
vernemq.imagePullSecrets |
vernemq’s image pull secrets |
|
vernemq.image.repository |
vernemq’s image repository |
|
vernemq.image.tag |
vernemq’s image tag |
|
vernemq.image.pullPolicy |
vernemq’s image pull policy |
|
vernemq.service.type |
vernemq’s service type |
|
vernemq.service.ports.mqtt.enabled |
whether vernemq’s mqtt port is enabled |
|
vernemq.service.ports.mqtt.port |
vernemq’s mqtt port |
|
vernemq.service.ports.mqtt.targetPort |
vernemq’s mqtt targetPort |
|
vernemq.service.ports.mqtt.containerPort |
vernemq’s mqtt containerPort |
|
vernemq.service.ports.mqtt.nodePort |
vernemq’s mqtt nodePort |
|
vernemq.service.ports.mqtt.protocol |
vernemq’s mqtt protocol |
|
vernemq.service.ports.mqtts.enabled |
whether vernemq’s mqtts port is enabled |
|
vernemq.service.ports.mqtts.port |
vernemq’s mqtts port |
|
vernemq.service.ports.mqtts.targetPort |
vernemq’s mqtts targetPort |
|
vernemq.service.ports.mqtts.containerPort |
vernemq’s mqtts containerPort |
|
vernemq.service.ports.mqtts.nodePort |
vernemq’s mqtts nodePort |
|
vernemq.service.ports.mqtts.protocol |
vernemq’s mqtts protocol |
|
vernemq.service.ports.ws.enabled |
whether vernemq’s ws port is enabled |
|
vernemq.service.ports.ws.port |
vernemq’s ws port |
|
vernemq.service.ports.ws.targetPort |
vernemq’s ws targetPort |
|
vernemq.service.ports.ws.containerPort |
vernemq’s ws containerPort |
|
vernemq.service.ports.ws.nodePort |
vernemq’s ws nodePort |
|
vernemq.service.ports.ws.protocol |
vernemq’s ws protocol |
|
vernemq.service.ports.wss.enabled |
whether vernemq’s wss port is enabled |
|
vernemq.service.ports.wss.port |
vernemq’s wss port |
|
vernemq.service.ports.wss.targetPort |
vernemq’s wss targetPort |
|
vernemq.service.ports.wss.containerPort |
vernemq’s wss containerPort |
|
vernemq.service.ports.wss.nodePort |
vernemq’s wss nodePort |
|
vernemq.service.ports.wss.protocol |
vernemq’s wss protocol |
|
vernemq.service.ports.prometheus.enabled |
whether vernemq’s prometheus port is enabled |
|
vernemq.service.ports.prometheus.port |
vernemq’s prometheus port |
|
vernemq.service.ports.prometheus.targetPort |
vernemq’s prometheus targetPort |
|
vernemq.service.ports.prometheus.containerPort |
vernemq’s prometheus containerPort |
|
vernemq.service.ports.prometheus.nodePort |
vernemq’s prometheus nodePort |
|
vernemq.service.ports.prometheus.protocol |
vernemq’s prometheus protocol |
|
vernemq.resources |
resource requests and limits |
|
vernemq.autoscaling.enabled |
whether vernemq’s autoscaling is enabled |
|
vernemq.podSecurityContext |
vernemq’s pod security context |
|
vernemq.securityContext |
vernemq’s security context |
|
vernemq.rbac.create |
if true, create & use RBAC resources |
|
vernemq.certificates |
vernemq’s sertificates |
|
vernemq.envVars |
vernemq’s environmental variables |
see values.yaml |
vernemq.persistence.enabled |
weather vernemq’s data persistence is enabled |
|
vernemq.persistence.existingClaim |
vernemq’s data persistence existing claim |
|
vernemq.persistence.accessModes |
vernemq’s data persistence access modes |
ReadWriteOnce` |
vernemq.persistence.size |
vernemq’s data persistence size |
|
vernemq.nodeSelector |
vernemq’s node selector |
|
vernemq.tolerations |
vernemq’s tolerations |
|
vernemq.affinity |
vernemq’s affinity |
|
frscript.enabled |
whether frscript component is enabled |
|
frscript.tier |
frscript’s tier |
|
frscript.replicaCount |
frscript’s number of replicas |
|
frscript.imagePullSecrets |
frscript’s image pull secrets |
|
frscript.image.repository |
frscript’s image repository |
|
frscript.image.tag |
frscript’s image tag |
|
frscript.image.pullPolicy |
frscript’s image pull policy |
|
frscript.service.type |
frscript’s service type |
|
frscript.service.ports.api.enabled |
whether frscript’s api port is enabled |
|
frscript.service.ports.api.port |
frscript’s api port |
|
frscript.service.ports.api.targetPort |
frscript’s api targetPort |
|
frscript.service.ports.api.containerPort |
frscript’s api containerPort |
|
frscript.service.ports.api.nodePort |
frscript’s api nodePort |
|
frscript.service.ports.api.protocol |
frscript’s api protocol |
|
frscript.service.ports.metrics.enabled |
whether frscript’s metrics port is enabled |
|
frscript.service.ports.metrics.port |
frscript’s metrics port |
|
frscript.service.ports.metrics.targetPort |
frscript’s metrics targetPort |
|
frscript.service.ports.metrics.containerPort |
frscript’s metrics containerPort |
|
frscript.service.ports.metrics.nodePort |
frscript’s metrics nodePort |
|
frscript.service.ports.metrics.protocol |
frscript’s mqtts metrics protocol |
|
frscript.resources |
resource requests and limits |
|
frscript.autoscaling.enabled |
whether frscript’s autoscaling is enabled |
|
frscript.podSecurityContext |
frscript’s pod security context |
|
frscript.securityContext |
frscript’s security context |
|
frscript.certificates |
frscript’s sertificates |
|
frscript.envVars |
frscript’s environmental variables |
see values.yaml |
frscript.nodeSelector |
frscript’s node selector |
|
frscript.tolerations |
frscript’s tolerations |
|
frscript.affinity |
frscript’s affinity |
|
mqttexplorer.enabled |
whether mqttexplorer component is enabled |
|
mqttexplorer.tier |
mqttexplorer’s tier |
|
mqttexplorer.replicaCount |
mqttexplorer’s number of replicas |
|
mqttexplorer.imagePullSecrets |
mqttexplorer’s image pull secrets |
|
mqttexplorer.image.repository |
mqttexplorer’s image repository |
|
mqttexplorer.image.tag |
mqttexplorer’s image tag |
|
mqttexplorer.image.pullPolicy |
mqttexplorer’s image pull policy |
|
mqttexplorer.service.type |
mqttexplorer’s service type |
|
mqttexplorer.service.ports.ui.enabled |
whether mqttexplorer’s ui port is enabled |
|
mqttexplorer.service.ports.ui.port |
mqttexplorer’s ui port |
|
mqttexplorer.service.ports.ui.targetPort |
mqttexplorer’s ui targetPort |
|
mqttexplorer.service.ports.ui.containerPort |
mqttexplorer’s ui containerPort |
|
mqttexplorer.service.ports.ui.nodePort |
mqttexplorer’s ui nodePort |
|
mqttexplorer.service.ports.ui.protocol |
mqttexplorer’s ui protocol |
|
mqttexplorer.resources |
resource requests and limits |
|
mqttexplorer.autoscaling.enabled |
whether mqttexplorer’s autoscaling is enabled |
|
mqttexplorer.podSecurityContext |
mqttexplorer’s pod security context |
|
mqttexplorer.securityContext |
mqttexplorer’s security context |
|
mqttexplorer.certificates |
mqttexplorer’s sertificates |
|
mqttexplorer.envVars |
mqttexplorer’s environmental variables |
see values.yaml |
mqttexplorer.nodeSelector |
mqttexplorer’s node selector |
|
mqttexplorer.tolerations |
mqttexplorer’s tolerations |
|
mqttexplorer.affinity |
mqttexplorer’s affinity |
|
See installation and configuration proccess in video.
1.3.4.8. Developer guide
1.3.4.8.1. FR-Script Documentation
In order for the fr_script to operate the user should provide relevant filters and rules corresponding to different use cases (scenarios).
The filters and rules should be provided in json format. GET, POST, PATCH, DELETE HTTP Methods can be used to fetch, post, update and delete json objects via an API respectively. Use endpoint /docs for accessing swgger UI.
The _json_ consists of two parts.
{
        “filters”: [],
        “rules”: []
}
Witch both contains an array of objects.
1.3.4.8.2. Filters
For the filtering, the MQTT topic which the user wants to filter is required. It consists of one or more topic levels and can contain “#” and “+” wildcard as well.
A subtopic is also required. It will get appended to the topic that is being filtered and create the new topic in which the filtered messages will be published. This can also consist one or more topic levels.
After setting the topic and subtopic of the filter, statements also need to get defined. Statements is an array of objects. Every statement consists of two components, a condition and a new_payload. A condition takes as value the same thing that an if statement expression would. Variables, values, comparison operators, logical operators and parenthesis, to set the priority of the operations. NOTE: Use spaces between every instance of the condition.
The variables should exist as key values in the json message sent to the topic that is being filtered. In the json file with the filters and rules that the user provides, those same variables should start with the $ sign, followed by their name. If the filtered json message has nested objects, the parent variable comes after the $ sign, followed by a dot . and then the child variable. Example: $parent.child
The new_payload takes as value a string value or "". The new_payload’s value is the new message that will be published at the newlly set filtered topic. If the new_payload’s value is "" and the statements condition is met, the initial message of the filtered topic will be sent.
Example
Let’s say we have a number of houses in a smart city. There are sensors installed inside and outside of those houses that generate data like the json below.
{"h_id":1,"inside":{"temperature":35,"humidity":60},"temperature":43,"wind_speed":34}
The sensors of every house publish their data in a topic like house/1, house/2, etc.
The team that inspects and monitors the smart city wants to receive the sensor’s data only when those exceed some threshold and not all of them, so they subscribe on the topic house/+/alert/ (“+” is a single-level wildcard that matches any name for a specific topic level.) and use the json below to set the rules for the filtering of the data being published on
house/#.
{
    "filters": [
        {
            "topic": "house/#",
            "subtopic": "alert/",
            "statements": [
                {
                    "condition": "( $inside.temperature < 20 and $inside.humidity >= 60 ) or $temperature < 5",
                    "new_payload": ""
                },
                {
                    "condition": "$inside.temperature >= 45 and $inside.humidity <= 15",
                    "new_payload": "fire_danger"
                }
            ]
        }
    ],
    "rules": []
}
The messages below published by the sensors of houses 1,2 and 3 in topics house/1, house/2 and house/3 respectively.
{"h_id":1,"inside":{"temperature":50,"humidity":6},"temperature":8,"wind_speed":34}
{"h_id":2,"inside":{"temperature":15,"humidity":60},"temperature":8,"wind_speed":34}
{"h_id":3,"inside":{"temperature":22,"humidity":55},"temperature":8,"wind_speed":35}
And the monitoring team’s client that was subscribed to the topic house/+/alert/ got the messages:
house/1/alert/--> b'fire_danger'
house/2/alert/--> b'{"h_id":2,"inside":{"temperature":15,"humidity":60},"temperature":8,"wind_speed":34}'
1.3.4.8.3. Rules
In the rules part of fr_script, every rule consists of two parts.
{
  “filters”: [],
  “rules”: [
    “statements”: [],
    “logic”: []
    ]
}
statements and logic witch both contains an array of objects.
The statements are situated very similar to the filters.
Every statement consists of the MQTT topic that the user wants to apply rules against, the condition which work exactly like the conditions in filtering, an id unique for every statement and the payload type of the messages’ fields sent to the above defined topic and are used as variables in our condition. Those can be int, float, str, bool.
Every instance in logic array consist of the logical operations which constitute the essence of the ruling part of the script, the newly created topic new_topic and the payload that would be published in it only if the logical operations return true.
Example
Let’s say we are managers in a mine. We have sensors inside the mine monitoring its environment as well as biometric sensors on every miner. The sensors monitoring mine’s environment produces messages like the json below:
{“temperature”: 25, “humidity”: 90}
and publish them in mine/environment topic.
The miners’ biometric sensors produce messages like:
{“m_id”:1, “body-temperature”: 36.6, “heart-rate”: 80}
And publish their data in a topic like miner/1, miner/2, etc.
So as managers we want to apply the following rules to monitor the miners’ wellbeing.
If miner’s heart rate is between 100-120 and the mine’s temperature is above 35 or the humidity is above 85 the miner should rest.
If miner’s body temperature is above 38 degrees and the mine’s temperature is above 30 the miner should leave.
If miner’s heart rate is 0 the miner is dead.
The fr_script should be as follows:
{
  “filters”: [],
  “rules”: [
    {
            "statements": [
                {
                    "id": 1,
                    "topic": "miner/#",
                    "payload_type": "float",
                    "condition": "$heart-rate >= 100 and $heart-rate <= 120"
                },
                {
                    "id": 2,
                    "topic": "mine/environment",
                    "payload_type": "int",
                    "condition": "$temperature > 35 or $humidity > 85"
                }
            ],
            "logic": [
                {
                    "operations": "( $1 ) and ( $2 )",
                    "new_topic": "action/rest",
                    "new_payload": ""
                }
            ]
        },
        {
            "statements": [
                {
                    "id": 3,
                    "topic": "miner/#",
                    "payload_type": "float",
                    "condition": "$body-temperature > 38"
                },
                {
                    "id": 4,
                    "topic": "mine/environment",
                    "payload_type": "int",
                    "condition": "$temperature > 30"
                }
            ],
            "logic": [
                {
                    "operations": "$3 and $4",
                    "new_topic": "action/leave",
                    "new_payload": ""
                }
            ]
        },
        {
            "statements": [
                {
                    "id": 5,
                    "topic": "miner/#",
                    "payload_type": "float",
                    "condition": "$heart-rate == 0"
                }
            ],
            "logic": [
                {
                    "operations": "$5",
                    "new_topic": "action/dead",
                    "new_payload": ""
                }
            ]
        }
    ]
}
The messages below published by the sensors on the workers’ 1 and workers’ 2 equipment as well as sensors on the mine itself. Our topics are miner/1, miner/2 and mine/environment respectively and the messages are published in the order shown bellow.
{"m_id":1, "body-temperature": 36.6, "heart-rate": 105}
to topic miner/1
{"m_id":2, "body-temperature": 38.6, "heart-rate": 75}
to topic miner/2
{"temperature": 35, "humidity": 90}
to topic mine/environment
{"m_id":1, "body-temperature": 16.6, "heart-rate": 0}
to topic miner/1
The monitoring team’s client that was subscribed to the topic !action will get the messages:
!action/rest--> "{'miner/1': {'m_id': 1, 'body-temperature': 39.6, 'heart-rate': 105}, 'mine/environment': {'temperature': 35, 'humidity': 90}}"
!action/leave--> "{'miner/2': {'m_id': 2, 'body-temperature': 38.6, 'heart-rate': 75}, 'mine/environment': {'temperature': 35, 'humidity': 90}}"
(Just after the message sent to topic mine/environment)
!action/dead--> "{'miner/1': {'m_id': 1, 'body-temperature': 16.6, 'heart-rate': 0}}"
NOTE: If the messages were sent in a different order like bellow:
{"m_id":1, "body-temperature": 36.6, "heart-rate": 105}
to topic miner/1
{"temperature": 35, "humidity": 90}
to topic mine/environment
{"m_id":2, "body-temperature": 38.6, "heart-rate": 75}
to topic miner/2
{"m_id":1, "body-temperature": 16.6, "heart-rate": 0}
to topic miner/1
And the monitoring team’s client that was subscribed to the topic !action will get the messages:
!action/rest--> "{'miner/1': {'m_id': 1, 'body-temperature': 39.6, 'heart-rate': 105}, 'mine/environment': {'temperature': 35, 'humidity': 90}}"
!action/dead--> "{'miner/1': {'m_id': 1, 'body-temperature': 16.6, 'heart-rate': 0}}"
This happens because when a logical operation comes True in fr_script’s rules and a new message is sent, the array holding the messages previously sent to fr_script, empty itself.
Lastly as we can see when “new_payload”: “” the new payload generated by fr_script is a json with the topic(s) used in the logic’s operations and their payload(s). Topics created by fr_script will always start with “!” as shown above.
1.3.4.9. Version control and release
VerneMQ v1.12.3
FR_Script v1.0
1.3.4.10. License
Copyright 2023 ICCS
Licensed under the Apache License, Version 2.0 (the “License”); you may not use this file except in compliance with the License. You may obtain a copy of the License at
Unless required by applicable law or agreed to in writing, software distributed under the License is distributed on an “AS IS” BASIS, WITHOUT WARRANTIES OR CONDITIONS OF ANY KIND, either express or implied. See the License for the specific language governing permissions and limitations under the License.