1.3.3. Semantic Annotation Enabler
1.3.3.1. Introduction
This enabler offers a service of syntactic transformation of JSON, CSV and XML data formats into RML, also known as semantic lifting, or semantic annotation.
It is primarily focused on streaming annotation through persistent annotation channels on MQTT or Kafka brokers.
Annotations are defined using the CARML dialect of RML language.
The annotator is controlled via a REST API with Swagger documentation (http://localhost:8080/swagger/#/ by default).
This enabler has reached a TRL of 6 during the execution of the ASSIST-IoT project.
1.3.3.2. Features
Streaming Annotation Enabler has the following feaures:
Configurable annotation from JSON, XML and CSV into RDF using CARML
Streaming annotation through persistent, configurable annotation channels
Support for MQTT and/or Kafka brokers
Standalone mode (without persistence) for lighter storage and memory footprint.
1.3.3.3. Place in architecture
The Semantic Annotation Enabler is part of the Data Management Plane of ASSIST-IoT.
The enabler requires at least one broker (Kafka or MQTT) to be present in the system. Although the Docker compose file can be used to quickly set everything up, the Semantic Annotator can connect to any broker and does not require a separate instance just for itself. To run in the persistent mode, and instance of MongoDB is also required. Setup details are described further on in this documentation.
The core functionality is designed to be used either independently, or integrated into a semantic pipeline before the Semantic Translation enabler. In the latter case the RDF produced by Semantic Annotator is consumed by Semantic Translator, so that the messages can then be translated into different ontologies.
CARML annotation configuration files can optionally be shared in the Semantic Repository, provided, that they do not contain any sensitive or confidential information about used data models and formats.
1.3.3.4. Quick start
1.3.3.4.1. Docker image
This step requires docker and docker-compose.
The quickest way to set everything up is to build an image using the provided Dockerfile and run it with the Docker compose file. Note that this is a quick local setup. To run the enabler in an ASSIST-IoT system, it is recommended to use the Helm chart and deploy it following the general ASSIST-IoT Enabler deployment instructions, with the help of ASSIST-IoT Manageability Enablers (e.g. the Smart Orchestrator).
To build the image:
docker build -t seaman_core .
1.3.3.4.1.1. Docker compose
Use the provided docker-compose.yml file to build and run the container with all other components.
docker-compose build
docker-compose up
Environment variables can be set in the docker-compose.yml file. Shared environment variables are additionally set in the .env file. Docker-compose file also sets up a container for a persistent database. If only the standalone mode is required, the database container does not need to be run - it can be turned off, or removed from the docker-compose.yml file altogether.
Unless configured otherwise, the REST API is available on port 8080 and database GUI on port 8081. Access credentials for the database GUI are set in the .env file. By default, the database port itself is not exposed.
1.3.3.4.2. Quick start - Usage
Run the Streamer via Docker compose and open swagger. Use examples from this documentation, or from the
/src/test/resourcesdirectory in the source code to configure an annotation channel.Use a GUI, such as MQTT Explorer to send and receive the messages. Use example messages from this documentation, or from the
/src/test/resourcesdirectory and send them to topics specified in the annotation channel configuration that you used.
1.3.3.4.2.1. Run only the core
Note, that this will start only the core, without all necessary components. Do it if you want to prepare your own setup e.g. for debugging or hacking the code. To tun it and bind ports:
docker run -p [x]:[y] seaman_core
Ports are set in the src/main/resources/application.conf file, or via environment variables passed to docker (their names are also in application.conf). In general, only the REST port needs to be exposed for incoming connections.
1.3.3.5. Prerequisites
The persistent mode of the Annotator, that allows it to store annotation channel configuration between restarts requires an instance of MongoDB to be started and configured before running the enabler. Standalone mode does not require a MongoDB instance (see configuration options for details).
To send and receive messages at least one instance of a Kafka and/or MQTT broker must be present. It does not need to be started before the Annotator, and can be run afterwards. Each annotation channel is configured independently and can use separate brokers, if need be. A broker should be running before an annotation channel that uses it is started. Otherwise the channel will fail to start and remain stopped.
The Semantic Annotator Enabler core itself has no particular requirements to run, but practical usage requires familiarity with the CARML language.
1.3.3.6. Installation
The enabler is designed to be run from a Docker image. The recommended way of running it in an ASSIST-IoT system, is to use the Helm chart provided in the ASSIST-IoT Helm Chart repository and deploy it with the help of ASSIST-IoT Manageability Enablers (e.g. the Smart Orchestrator), following the general ASSIST-IoT Enabler deployment instructions.
Alternatively, the enabler can be run from the Docker compose file.
Finally, the code can be compiled and run locally.
1.3.3.6.1. Docker image
For instructions about using the Docker image, see Quick start.
1.3.3.6.2. Manual compilation
Note that running the enabler code does not include and instance of a MongoDB database, nor a streaming broker. Those need to be set up and configured separately (see configuration options for details).
1.3.3.6.2.1. Universal package
Thanks to the sbt-native-packager plugin, the code can be packaged into a native executable.
For default settings, run $ sbt stage. The application can be run
from target/universal/scripts/bin/[executable name]
For more packaging options, see native packager project archetypes
1.3.3.6.2.2. JAR
To package the code into a .jar file, use sbt commands.
sbt update
sbt compile
sbt package
The output .jar file can be found in target/scala-[version] directory
and can be run with the $ java -jar [.jar filename] command.`.
Alternatively you can try to build a far JAR using the sbt-assembly plugin, but you’ll have to set and test a merge strategy.
sbt assembly
1.3.3.7. User guide
The Semantic Annotator turns JSON, XML or CSV files into RDF in a streaming fashion. General usage requires preparation of CARML annotation files, setting up an annotation channel through the REST API, and finally sending and receiving messages from appropriate topics on the streaming broker.
1.3.3.7.1. Annotation files
Annotation files are written in CARML language, which is a dialect of RML. Both are serialized in RDF Turtle format. Any annotation file must contain a single “source” that is a “CARML stream”, like in the following snippet:
@prefix rr: <http://www.w3.org/ns/r2rml#> .
@prefix rml: <http://semweb.mmlab.be/ns/rml#> .
@prefix map: <http://mapping.example.com/> .
@prefix carml: <http://carml.taxonic.com/carml/> .

map:example_map a rr:TriplesMap ;
    rml:logicalSource[
        a rml:LogicalSource  ;
        rml:source [
            a carml:Stream
            ];

        rml:referenceFormulation ql:JSONPath ;
        rml:iterator "$" ;
        ]

    rr:predicateObjectMap map:example_000 ;
    rr:subjectMap [
        a rr:SubjectMap ;
        rr:template "example template"
        ] .
The meaning individual parts of the snippet is as follows:
A list of prefixes is required for technical correctness of the Turtle format. The prefixes listed here are used in every annotation file.
@prefix rr: <http://www.w3.org/ns/r2rml#> .
@prefix rml: <http://semweb.mmlab.be/ns/rml#> .
@prefix map: <http://mapping.example.com/> .
@prefix carml: <http://carml.taxonic.com/carml/> .
A source of data must be defined - the annotator supports only CARML streaming sources. This part is also included in every annotation file.
map:example_map a rr:TriplesMap ;
    rml:logicalSource[
        a rml:LogicalSource  ;
        rml:source [
            a carml:Stream
            ];
The source must include a declaration of the input data format - in the example below JSON is declared, with the base selector “$” (see here for more details about JSON Path selectors).
rml:referenceFormulation ql:JSONPath ;
rml:iterator "$" ;
Formally, an annotation file must contain a mapping, that connects the CARML source to the actual definition of the mapping (
example_000below). In actual annotation files, this part would be followed by the part of the file, that defines how the input is transformed into the output.
rr:predicateObjectMap map:example_000 ;
rr:subjectMap [
    a rr:SubjectMap ;
    rr:template "example template"
    ] .
More details about how to write CARML files, as well as helpful tools
and examples can be found on the
CARML and
RML websites. To write your first
annotation file, it is recommended to start from an example provided in
the /src/test/resources directory in the source code and modify it.
1.3.3.7.2. Annotation channels
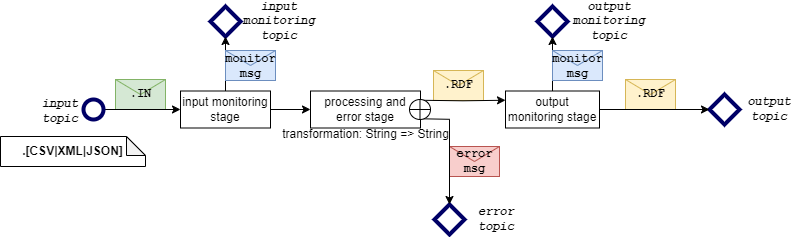
This enabler uses a streaming channel architecture that annotates the messages between a series of topics exposed by a streaming broker (see figure below). Messages sent to the input topic are pushed through the channel, processed at different stages, and finally the result is written to the output topic. The input and output topics are always used, whereas the rest is optional.
The first optional “input monitoring” stage outputs a simple message for any message that passes through in order to confirm that a message was received.
The processing and error stage attempts to transform the message using an annotation configuration file (CARML). If unsuccessful, errors are output on the error topic. Otherwise the annotated message passes through.
The “output monitoring” stage is equivalent to the “input monitoring” stage in its functionality
Finally, the annotated message is written to the output topic
Input and output topics are always active, provided that the channel is not stopped. Monitoring and error topics can be optionally enabled or disabled at runtime.
SemAnnTopics
1.3.3.7.2.1. Setting up a channel
To set up a channel one must prepare a channel configuration in JSON. The configuration defines some metadata, annotation configuration (CARML) and settings to connect to a broker, like in the snipped below:
{
  "metadata": {
    "name": "Demo channel",
    "description": "Demonstrative channel with example mapping.",
    "tags": ["example tag"],
    "mapping": {
      "name": "Demo CARML",
      "description": "Demonstrative CARML mapping",
      "tags": ["example tag"],
      "inputFormat": "JSON",
      "outputFormat": "TTL",
      "rml": "..."
    }
  },
  "settings": {
    "inputTopicSettings": {
      "topic": "test/demo/input",
      "brokerType": "MQTT",
      "mqttSettings": {
        "host": "127.0.0.1",
        "port": 1883,
        "protocol": "tcp",
        "user": "username",
        "password": "password"
      },
    },
    "outputTopicSettings": {
      "brokerType": "MQTT",
      "topic": "test/demo/output"
    },
    "errorTopicSettings": {
      "brokerType": "MQTT",
      "topic": "test/demo/error",
    },
  },
  "status": {
    "errorTopicEnabled": true,
    "isStopped": false
  }
}
Here is a short explanation of the part of the snippet:
A channel has some metadata attached to it
"metadata": {
    "name": "Demo channel",
    "description": "Demonstrative channel with example mapping.",
    "tags": ["example tag"],
    "mapping": {
      "name": "Demo CARML",
      "description": "Demonstrative CARML mapping",
      "tags": ["example tag"],
      "inputFormat": "JSON",
      "outputFormat": "TTL",
      "rml": "..."
    }
Arguably the most important part is the definition of a CARML mapping. It declares the input (JSON, XML or CSV) and output (a serialization of RML, Turtle is recommended for readability and compactness) formats, and the CARML mapping itself. Note, that in the example below the actual CARML code is omitted. The actual
"rml"field should contain CARML code with JSON escaping, so that it can be put in a JSON string.
"mapping": {
  "name": "Demo CARML",
  "description": "Demonstrative CARML mapping",
  "tags": ["example tag"],
  "inputFormat": "JSON",
  "outputFormat": "TTL",
  "rml": "..."
}
Broker settings are defined per topic. The only mandatory settings are the ones for input and output topics. A broker type (MQTT or Kafka) and a topic name must be defined. The values can be different for each topic, and a single channel may use some topics from a Kafka broker, and others from MQTT. The topics are entirely independent. Broker connection data (IP, port, authentication settings etc) can be specified per topic. If this data is missing, it will be filled in with default values (see Configuration).
"settings": {
    "inputTopicSettings": {
      "topic": "test/demo/input",
      "brokerType": "MQTT",
      "mqttSettings": {
        "host": "127.0.0.1",
        "port": 1883,
        "protocol": "tcp",
        "user": "username",
        "password": "password"
      },
    },
    "outputTopicSettings": {
      "brokerType": "MQTT",
      "topic": "test/demo/output"
    },
Additional settings for the optional topics follow the same rules, as for the input and output topics.
  "errorTopicSettings": {
    "brokerType": "MQTT",
    "topic": "test/demo/error",
  },
},
Finally, initial channel status can be set, so that channels can be defined, but not started. The same is true for the optional topics.
"status": {
  "errorTopicEnabled": true,
  "isStopped": false
}
After loading the configuration in (see REST API) you may notice, that the file is larger than originally. This is because any optional values are filled in with defaults after the file is loaded (see Configuration).
For more information about JSON formats for channel configuration, see REST API.
1.3.3.7.3. Using a channel
Once a channel is defined and started (i.e. the isStopped flag is
not set to true), you may write to the input topic on the configured
broker, and receive annotated messages on the output topic. Keep an eye
on the log file (or stdout of the running container), or the error topic
(if configured) in case of any problems.
1.3.3.8. Rest api
The annotator is controlled via a REST API. Full up-to-date
documentation with detailed explanation of all endpoints and data
formats can be found in the Swagger GUI available at /swagger/
(e.g. http://localhost:8080/swagger/#/, if the enabler is running on
localhost with the default port number).
Method |
Endpoint |
Description |
|---|---|---|
GET |
/swagger/ |
View the REST API documentation and Swagger interface. |
In summary, the API is divided into three endpoint groups:
/version, /status, /settings - These endpoints return
information about the running enabler. Note that global settings cannot
be modified at runtime (see Configuration), and can
only be read from these endpoints.
Method |
Endpoint |
Description |
|---|---|---|
GET |
/version |
Returns software version information. |
GET |
/status |
Returns global status, including errors, if there are any. |
GET |
/settings |
Returns current global settings. |
/annotations/* - These endpoints are used to access the annotation
storage. If the enabler is run in standalone mode (without persistence),
the endpoints are not available. The annotations storage is an
independent component that is meant to provide a dedicated space to
store annotations. The internal annotation IDs that are used to retrieve
annotations are not used outside of this component. Note, that the
channel configuration JSON does not refer to any annotation IDs and
instead contains full CARML definition.
M e t h o d |
Endpoi nt |
Description |
|---|---|---|
G E T |
/annot ations /({ann otatio nId}) |
Retrieve information about all annotations, or a single annotation (if the optional annotationId is provided). Additional parameters are supported, similar to the GET /channels endpoint. |
P O S T |
/annot ations |
Add a new annotation to storage. |
D E L E T E |
/annot ations /{anno tation Id} |
Remove an annotation from storage. |
/channels/* - Group of endpoints to control channel creation,
removal, and status.
M e t h o d |
End poi nt |
Description |
|---|---|---|
G E T |
/ch ann els /({ cha nne lId }) |
Retrieve information about all channels, or a single channel (if the optional channelId is provided). Additional parameters can be used to retrieve information selectively, e.g. ?settings=true returns settings information, ?status=true returns status. Parameters may be used together. |
P O S T |
/ch ann els |
Add a new channel definition, and optionally materialize and start the channel. This endpoint accepts channel configuration in JSON. Depending on initial status (written in the configuration file), the channel may be added, but not started. |
P A T C H |
/ch ann els /{c han nel Id} |
Updates the channel status with values provided in the channel status object provided in the request body. With the the channel status object, the channel can be started or stopped, or error/monitoring topic settings updated (see channel architecture below). |
P A T C H |
/ch ann els /{c han nel Id} /re sta rt |
Stop and then start a channel. |
D E L E T E |
/ch ann els /{c han nel Id} |
Stop and remove a channel. |
1.3.3.9. Annotations
The Semantic Annotator uses CARML
language, which is a dialect of RML to
define the annotations. CARML files are serialized in RDF. Large CARML
files, even if serialized to Turtle (a relatively compact RDF
serialization) can be very difficult to read and/or write. When writing
your own annotations we recommend starting from examples provided in the
/src/test/resources directory in the source code of the enabler, and
modifying them step by step.
An alternative process is to author RML files first, and then transform them to CARML. Because CARML and RML are meant to be compatible, it mostly requires modifying only the “RML source” part of the file to fit the “CARML stream” format (see User Guide for details on how it looks like).
The easiest way to author RML files is to use an intermediary format called YARRML. It is a more human-readable format, that compiles to RML. An online editor Matey is available to quickly prototype mappings.
1.3.3.10. Configuration
Before running, configuration options for the enabler may be specified in the application.conf file. This file is the final point where configuration is stored. Other options of configuration, such as environment variables values, all eventually end up in this file. With this in mind, the enabler can be configured in the following ways:
If running from a Helm chart, in the values file (
/helm-chart/values.yaml). More information about Helm values can be found here. Note, that the values can be overriden when deploying the chart in Kubernetes. The override can be done whether deploying from command line, or from ASSIST-IoT Smart Orchestrator. See the Smart Orchestrator documentation for details.If running from Docker Compose, in the docker compose file (
/docker-compose.yml) and in the environment variables file (/.env). Note, that the environment variables values can be overridden when running the docker compose command. See docker compose documentation for details.If running from Docker, or directly from code, in the application.conf file (
/src/main/resources/application.conf). Environment variables may be passed when running the docker, or jar commands.
1.3.3.10.1. Configuration options
The configuration options are described as they appear in the application.conf file. The names of the corresponding environment variables (if available) are also given.
1.3.3.10.1.1. General settings
seaman {
    http {
      port = 8080
      host = "0.0.0.0"
    }
}
Hostname and port on which the REST API will be available.
Environment variables: SEAMAN_REST_HOST and SEAMAN_REST_PORT.
seaman {
    max-shutdown-duration = "20 seconds"
    parallelism = 2
    buffer-size = 10
}
Maximum time to wait for all channels to gracefully stop, after receiving the shutdown signal.
Default number of parallel threads per channel. Set this option to 1 on less powerful systems with limited threading.
Default size of the message buffer on each stage of a channel.
These options do not have environment variables.
seaman {
    standalone-mode = false
    restore-channels-stopped = false
}
Standalone mode means, that the MongoDB database is not used, and the streamer will not attempt to connect to it. This also means, that no channel configuration, or annotations are persisted between restarts. Use this option to reduce resource usage, but remember, that you will have to recreate all channels manually after restart. If set to
truein the Helm chart, the MongoDB container will not be deployed. Environment variable:SEAMAN_STANDALONE_MODEIf set to
true, all channels will be initially stopped after the streamer is started. Otherwise, the streamer will attempt to restore the status of the channels before shutdown. Note, that a graceful shutdown stops all channels anyway. This option is useful in case of frequent failures (e.g. network, power), to avoid too many reconnects to the broker. Environment variable:SEAMAN_RESTORE_STOPPED
seaman {
    encryption {
        auth_secret = "..."
    }
}
A secret key to encrypt passwords for storage. The key should have 32
characters. For additional security, each individual deployment should
have its own secret key. Note, that changing the secret key will prevent
the decryption of previously stored usernames and passwords. Environment
variable: SEAMAN_ENCRYPTION_AUTH_SECRET
1.3.3.10.1.1.1. Logging
akka {
  loglevel = "DEBUG"
}

seaman {
    log-to-file = false
}
Seamann writes log messages to stdout of the container in which it runs.
Additionally, it may write the log to file - the default path is
log/seaman.log and can be configured in the logback file
()``/src/main/resources/logback.xml``) along with other logging options,
such as log rotation, buffering, etc.
Logging level of
DEBUG is not recommended for production deployments, because it
produces a lot of output.
Environment variables: SEAMAN_LOG_LEVEL, SEAMAN_LOG_TO_FILE
1.3.3.10.1.2. Database
mongodb-client {
    host = "127.0.0.1"
    port = 27017
    database = "seaman"
    user = "seaman"
    password = "..."
}
If the streamer is not running in standalone mode (see above) it will connect to a MongoDB database instance to store annotations and channel configurations. These options define the connection string, including the address of the database instance, user credentials, and name of the database to use. When used with Docker compose, or the Helm chart, the database container is automatically configured with the same values. When using a custom setup with multiple containers you may need to make sure, that container networks are visible to each other. Any error messages will be written to log (see above).
Environment variables: MONGO_HOST, MONGO_PORT,
MONGO_DATABASE, MONGO_USER, MONGO_PASSWORD
1.3.3.10.1.3. Brokers
kafka-broker = {
  host = "127.0.0.1"
  port = 9093
}

mqtt-broker = {
  protocol = "tcp"
  host = "127.0.0.1"
  port = 1883
}
Connection settings for Kafka and MQTT brokers. Note that these values are only the defaults and may not be used in practice. Each channel has their own broker configuration options. The values provided here are used only if the channel configuration does not explicitly define them.
Environment variables: SEAMAN_KAFKA_HOST, SEAMAN_KAFKA_PORT,
SEAMAN_MQTT_PROTOCOL, SEAMAN_MQTT_HOST, SEAMAN_MQTT_PORT
mqtt-broker = {
  inputClientId = "semann/source",
  outputClientId = "semann/sink"
  errorClientId = "semann/error"
  monitorInputClientId = "semann/monitor/input"
  monitorOutputClientId = "semann/monitor/output"
}
Default prefixes for MQTT topic names can also be set up. Just like the broker connection strings, these are only the defaults and can be set up individually per channel.
Environment variables: SEAMAN_MQTT_INPUT_CLIENT_ID
SEAMAN_MQTT_OUTPUT_CLIENT_ID, SEAMAN_MQTT_ERROR_CLIENT_ID,
SEAMAN_MQTT_MONITOR_INPUT_CLIENT_ID,
SEAMAN_MQTT_MONITOR_OUTPUT_CLIENT_ID
1.3.3.11. Developer guide
The streaming component is built with Scala using Akka Streams and Akka Http - parts of the Akka framework, and depends primarily on Carml to process RML files.
To start with development, follow the Quick Start guide, and see the Javadoc documentation included in the source code.
1.3.3.12. License
The Semantic Annotator is licensed under the Apache License, Version 2.0 (the “License”).
You may obtain a copy of the License at: Apache License 2.0
RML Language and all relevant software, documentation, and reference examples are licensed under MIT License. Note, that this enabler does not use any RML software directly, and is therefore independently licensed.
You may obtain a copy of the License at: MIT License