1.2.5. Multi-link enabler
1.2.5.1. Introduction
The main goal of this enabler is to manage different wireless access networks, so in case the primary link is down a second one is up without noticing (at least, not by the user) any kind of service disruption.
This enabler has reached a TRL of 5 during the execution of the ASSIST-IoT project.
1.2.5.2. Features
The main concept of this enabler involves bringing the bonding capabilities of Ethernet interfaces belonging to a network, to multiple wireless ones. Three main features will be supported by this enabler:
It is intended to work at least for WiFi, fluidmesh and 5G networks, allowing establishing prioritisation of channels.
It will setup automatically the necessary tunnels.
In case that the primary link is restored, it should go back to the initial wireless technology.
Note
This enabler needs access to the host network and privileges to have access to the host’s kernel (to create/modify interfaces).
1.2.5.3. Place in architecture
The Multi-link enabler is located in the Smart Network and Control plane of the ASSIST-IoT architecture. In particular, it will be one of the enablers devoted to extend the basic features of the system, in this case serving as a bridge of multiple wireless access networks.
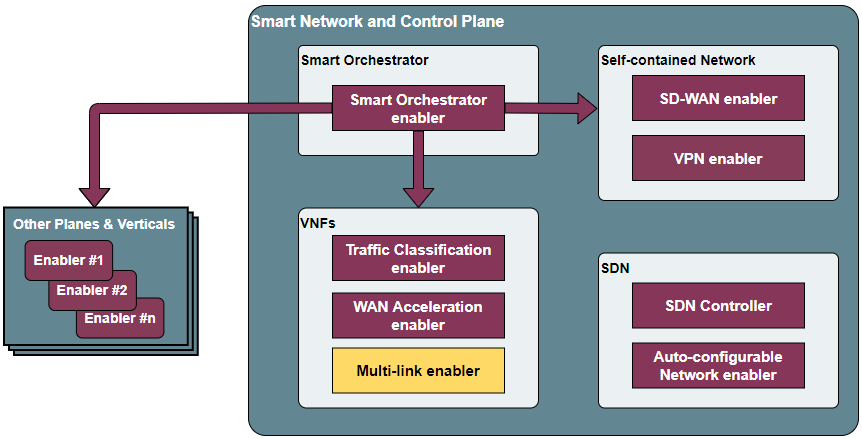
Place of the Multi-link enabler within the Smart Network and Control Plance architecture
The enabler is composed of three main elements, as one can see in the figure below:
Multilink API: an API REST will facilitate the configuration of the enabler by an administrator user.
Bonding component: It will be used for establishing the necessary bridges, bonding and prioritisation rules in a GWEN (or similar gateway device). It will bond the tunnels that will travel over different radio technologies, establishing a primary one and backups.
VPN Client/Server: P2P tunnels will be established over the system, so the wireless networks belong to the same virtual one. To that end, an underlying VPN technology is needed.
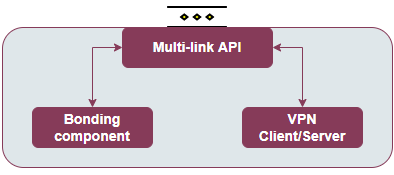
Multi-link enabler architecture
Note
This enabler will have two instances, one with the VPN client active and the other with the server, as these tunnels require implementing a server-client mode (hence, connected). For easing its management, they will be configured via a unified user interface.
The “internal” VPN will have a different implementation than the VPN enabler. The internal VPN will require a “TAP” implementation, layer 2, being the homonymous enabler implemented in “TUN”, layer 3. The dedicated enabler supports much larger numbers of connections without reducing performance, whereas in this case this is not as important as great number of backup wireless technologies are not expected (tests will be done with two).
1.2.5.4. User guide
1.2.5.4.1. REST API endpoints
The API has not been developed yet, in the following table is presented the design of the endpoints that are intended to be implemented.
Server
Method |
Endpoint |
Description |
Request body parameters |
Example request body |
POST |
/v1/server/start |
Start the multilink server |
"bride_interface": <Name of the bridge interface that will be created in the server host network.>,
"bridge_ip": <IP address of the bridge interface. It has per default a netmask /24 so not include it in the value.>,
"links": <number of links (interfaces) that will be used to communicate with the client.>
|
{
  "bride_interface": "br0",
  "bridge_ip": "10.8.0.254",
  "links": "2"
}
|
GET |
/v1/server/key |
Get the symetric key of the tunnels of the server |
None
|
None
|
POST |
/v1/server/stop/{bridge_interface} |
Stop the server with bond interface named {bridge_interface} |
None
|
None
|
GET |
/v1/server/status |
Returns if the server has been started or not |
None
|
None
|
Client
Method |
Endpoint |
Description |
Request body parameters |
Example request body |
POST |
/v1/client/start |
Start the multilink client |
"server_api_url": <HTTP address by which the API of the multilink-server can be reached>,
"bond0": <Name of the bridge interface that will be created in the client host network.> {
"ip_address": <IP address of the bridge interface. It has per default a netmask /24 so not include it in the value.>,
"slaves": <Array of all the interfaces that will be configured in the bond> [
    {
      "hw_int": <Interface name>,
      "ip_server": <IP address of the server that can be reach by this interface>,
      "netmask": <Netmask of the network>
    }
"bonding": {
  "bonding_mode": <Select bonding mode for the bond interface>,
  "primary": <This is the interface that will be used as primary what means that always this interface is active and has connectivity with the server it will be used to communicate with>,
  "arp_ip_target": <This will be the IP of the other extreme of the tunnels what means the ip of the server bridge>,
  "arp_interval": <Specifies the ARP link monitoring frequency in milliseconds>,
  "fail_over_mac": <Change mac address of the currently actice slave>,
  "arp_validate": <Specifies the type of arp validation>
  }
|
{
  "server_api_url": "http://158.42.89.111:3333",
  "bond": {
    "bond0": {
      "ip_address": "10.8.0.253",
      "slaves": [
        {
          "hw_int": "eth0",
          "ip_server": "158.42.89.111",
          "netmask": "255.255.255.0"
        },
        {
          "hw_int": "wlan0",
          "ip_server": "192.168.150.100",
          "netmask": "255.255.255.0"
        }
      ],
      "bonding": {
        "bonding_mode": "1",
        "primary": "tap1",
        "arp_ip_target": "10.8.0.254",
        "arp_interval": "100",
        "fail_over_mac": "1",
        "arp_validate": "5"
      }
    }
  }
}
|
GET |
/v1/client/status |
Return if the client has been started or not |
None
|
None
|
POST |
/v1/client/stop/{bond_interface} |
Stop the client with bond interface named {bond_interface} |
None
|
None
|
PUT |
/v1/client/bond_params/{bond_interface} |
Change the bond parameters of the bond interface named {bond_interface} |
{
  # It can be changed any parameter of the bond interface
  "primary": "tap2",
  "arp_interval": "50"
}
|
{
  "primary": "tap2",
  "arp_interval": "50"
}
|
GET |
/v1/client/bond_params/{bond_interface} |
Get the bond parameters of the bond interface named {bond_interface} |
None
|
None
|
Common (Client & Server)
COMMON (CLIENT & SERVER) |
||
|---|---|---|
Method |
Endpoint |
Description |
POST |
/v1/tap_down/{tap} |
Bring down tunnel interface named {tap} |
POST |
/v1/tap_up/{tap} |
Return if the client has been started or not |
POST |
/v1/ping_test |
Ping to ip address provided in the body |
GET |
/v1/api-export |
Return OpenApi specification |
GET |
/version |
Returns version of the enabler |
GET |
/helth |
Returns if the enabler is healthy |
1.2.5.5. Prerequisites
The enabler requires the base Kubernetes environment with Helm.
1.2.5.6. Installation
The easiest way to install the Multilink client and server is deploying the helm charts (client and server) with a defined configuration.
Server configuration
Download the helm chart of the multilink-server in the server machine:
# Add assist pulic repo
helm repo add assist-public-repo https://gitlab.assist-iot.eu/api/v4/projects/85/packages/helm/stable
#Pull the helm chart and decompress it
helm pull assist-public-repo/multilink-server  --untar
cd multilink-server/
Open the values file of the server with your preferred editor
nano deployment/server/helm/multilink-server/values.yaml
By default the helm chart deploy the API in the port 3333, taking into account that the deployment has access to the host network (hostNetwork flag is true) if you already use this port or you want to change it change the sections:
api.service
# Configuration of the service: type and ports.
service:
  type: NodePort
  ports:
    api:
      port: 3333
      targetPort: 3333
      containerPort: 3333
      nodePort: ""
      protocol: TCP
api.envVars.apiMultilinkServerPort
# Configuration of the api port
envVars:
  exampleEnvVar: exampleValue
  apiMultilinkServerPort: 3333
Modify the serverConfig with your configuration. If you don’t need to change the values (don’t have already an interface called br0) it is recommended to leave this section as it is.
bridge_interface: Name of the bridge interface that will be created in the server host network. Change it only if there exists already an interface named “br0” in your host network.
bridge_ip: IP address of the bridge interface. It has per default a netmask /24 so not include it in the value.
links: number of links (interfaces) that will be used to communicate with the client.
####################################### VALUES TO CONFIG THE SERVER #######################################

serverConfig:
  bridge_interface: br0
  bridge_ip: 10.8.0.254
  links: 2

################################################### END ###################################################
Deploy the helm chart of the multilink-server:
helm install multilink-server ./deployment/server/helm/multilink-server
Client configuration
Download the helm chart of the multilink-client in the client machine:
# Add assist pulic repo
helm repo add assist-public-repo https://gitlab.assist-iot.eu/api/v4/projects/85/packages/helm/stable
#Pull the helm chart and decompress it
helm pull assist-public-repo/multilink-client  --untar
cd multilink-client/
Open the values file of the client with your preferred editor
nano deployment/client/helm/multilink-client/values.yaml
By default the helm chart deploy the API in the port 3333, taking into account that the deployment has access to the host network (hostNetwork flag at true) if you already use this port or you want to change it change the sections:
api.service
# Configuration of the service: type and ports.
service:
  type: NodePort
  ports:
    api:
      port: 3333
      targetPort: 3333
      containerPort: 3333
      nodePort: ""
      protocol: TCP
api.envVars.apiMultilinkServerPort
# Configuration of the api port
envVars:
  exampleEnvVar: exampleValue
  apiMultilinkClientPort: 3333
Modify the clientConfig section with your configuration.
serverApiUrl: This is the http address by which the API of the multilink-server can be reached. In the example is the ethernet ip of the server.
bondInterfaceName: Name of the bond interface that will be created in the client host network. Change it only if there exists already an interface named “bond0” in your host network.
bondIpAddress: IP address of the bond interface. It has per default a netmask /24 so not include it in the value.
slaves: This is a json array of all the interfaces that will be configured in the bond. The info needed for each interface is:
hw_int: interface name.
ip_server: IP address of the server that can be reach by this interface. In the expample this is the ip of the server in the ethernet and wifi networks.
netmask: Netmask of the network.
The rest of the values are referred to the bond configuration, the only parameters that need to be changed are:
primary: This is the interface that will be used as primary what means that always this interface is active and has connectivity with the server it will be used to communicate with. Each interface in the slaves array will have attached a tap tunnel, the name of the tunnel will be tap followd by the number in the array (check the clientConfig.slaves array an pick your primary interface).
arp_ip_target: This will be the IP of the other extreme of the tunnels what means the ip of the server bridge (previous section configured).
The rest of the parameters of the bonding it is recommended to not change it, to know more about bonding parameters and their configuration check the documentation.
####################################### VALUES TO CONFIG THE CLIENT #######################################

clientConfig:
  serverApiUrl: http://158.42.89.111:3333
  bondInterfaceName: bond0
  bondIpAddress: 10.8.0.253
  slaves:
    [{                              #####
      "hw_int": "eth0",                 #
      "ip_server": "158.42.89.111",     #  tap1
      "netmask": "255.255.255.0"        #
    },                              #####
    {                               #####
      "hw_int": "wlan0",                #
      "ip_server": "192.168.150.100",   #  tap2
      "netmask": "255.255.255.0"        #
    }]                              #####

  primary: tap1
  arp_ip_target: 10.8.0.254
  bonding_mode: 1
  arp_interval: 50
  fail_over_mac: 1
  arp_validate: 5

################################################### END ###################################################
Deploy the helm chart of the multilink-client:
helm install multilink-client ./deployment/client/helm/multilink-client
1.2.5.6.1. Check Multilink deployment
Once the client and the server have been deployed you can check the connectivity SERVER-CLIENT, executing in the SERVER machine:
ping <ip_client_side>
and CLIENT-SERVER, executing in the CLIENT machine:
ping <ip_server_side>
1.2.5.6.2. Clean the installation
If there is any error and don’t know how to clean the deployment, we recommend to uninstall the helm charts and reboot the system, due all the changes in the host network and ip routes did by the multilink enabler are not persistent.
1.2.5.7. Configuration options
1.2.5.7.1. Helm chart
It is possible to change the configuration of the enabler modifying the values.yaml file of the Multilink client/server helm chart. It is a must to review/change the configuration before to proceed to install the helm chart. Check the Installation section to know more about the values needed to be changed.
1.2.5.7.2. API
Once the enabler is deployed it is possible to modify the configuration or apply changes to the bond or tunnel interfaces making request to the API (Client or Server). Check REST API endpoints section to know more about the requests.
1.2.5.8. Developer guide
This code is expected to be executed within a Helm chart, in a Kubernetes-governed platform. In case that developers aims at using the code directly over a given Operating System, non-virtualized, the code has been tested in Ubuntu 20.04 machines in amd64 and arm64 (Raspberry Pi 4), and hence we do not grant that it will work in any other OS.
This code is open source and can be freely used by the innovation and research community. In case that commits are to be made, the mantainer team (UPV) holds the rights to accept or deny them. Best practices are encouraged in the latter case.
1.2.5.9. Version control and release
Version 1.0.0
1.2.5.10. License
Copyright 2023 Universitat Politècnica de València
Licensed under the Apache License, Version 2.0 (the “License”); you may not use this file except in compliance with the License. You may obtain a copy of the License at
https://www.apache.org/licenses/LICENSE-2.0.
Unless required by applicable law or agreed to in writing, software distributed under the License is distributed on an “AS IS” BASIS, WITHOUT WARRANTIES OR CONDITIONS OF ANY KIND, either express or implied. See the License for the specific language governing permissions and limitations under the License.
1.2.5.11. Notice (dependencies)
This enabler will not require of any other enabler deployed to be fully functional.
1.2.5.11.1. Components
VPN Client/Server:
OpenVPN: GNU General Public License v2.0 or later.
Bonding component:
Linux kernel: GNU General Public License v2.0 or later.
Main application (API Multi-link Client/Server) dependencies
Dependency |
License |