1.2.8. VPN enabler
1.2.8.1. Introduction
This enabler facilitates the access to a node or device from a different network to the site’s private network using a public network (e.g., the Internet) or a non-trusted private network.
This enabler has reached a TRL of 5 during the execution of the ASSIST-IoT project.
1.2.8.2. Features
This enabler act as a VPN server (based on WireGuard VPN) that allows client connections to the created VPN network and, if allowed, to the host machine network. For that reason, this enabler can allow the connection to a Kubernetes node machine and its private network from a machine allocated in a different private network. Furthermore, a REST API is included to facilitate the administration of the VPN network.
VPN clients information can be persisted in the LTSE or in an independent MongoDB instance.
Note
At this point in time, this enabler is limited to one replica in each Kubernetes deployment and cannot be auto scaled due to its specific functionalities. If there are more than one replica, each pod will act as an independent VPN because each pod will have its own WireGuard network interface at the container level which won’t be synchronized among them. For example, a new client will only be created or deleted in one pod.
Note
To connect two host machines directly using a VPN (for instance, to add it as a remote k8s cluster/node via VPN), it is recommended to use a VPN without using the containerised version. For that, it can be followed the “Developer guide” in order to run the app using Node.js or create a custom Service in Linux. In addition, another option is to use directly the Wireguard commands, but the functionalities provided by the API will be lost.
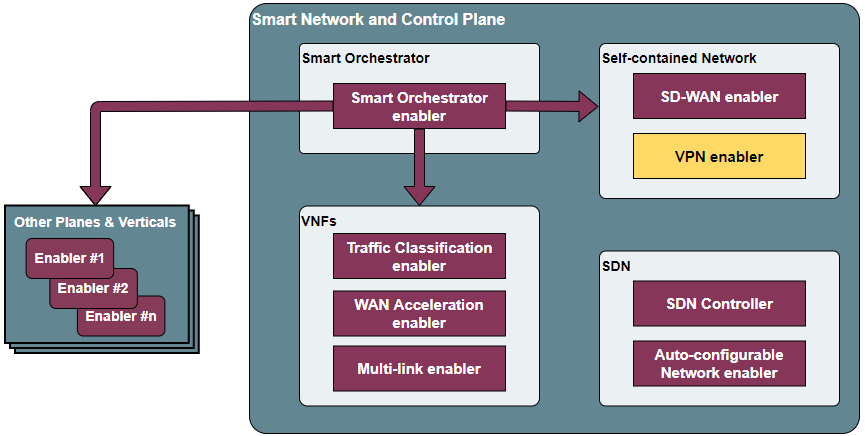
1.2.8.3. Place in architecture
The VPN enabler is located in the Smart Network and Control plane of the ASSIST-IoT architecture.
The enabler is composed of two elements:
VPN Server: the core of the VPN, the clients will connect to this component.
API REST: an API REST is provided to manage the VPN clients (create, delete, enable and disable) and to obtain information about the VPN network and its clients.

1.2.8.4. User guide
1.2.8.4.1. REST API endpoints
Method |
Endpoint |
Description |
Payload (if needed) |
Response format |
|---|---|---|---|---|
GET |
/version |
Get the enabler version |
{ “enabler”: String, “version”: String } |
|
GET |
/health |
Get the enabler’s health status |
||
GET |
/api-export |
Get the OpenAPI specification in JSON |
OpenAPI specification in JSON |
|
GET |
/info |
Get information of the WireGuard network interface |
WireGuard output command in plain text |
|
GET |
/info/conf |
Get the configuration file of the WireGuard network interface |
WireGuard configuration file in plain text |
|
GET |
/keys |
Obtain the public, private and pre-shared keys to create a new client |
{“public”:String, “private”:String, “preshared”:String} |
|
POST |
/client |
Create a new client |
{“publicKey”:String, “presharedKey”:String} |
{“serverPublicKey”:String, “serverIP”:String, “serverPort”:Integer, “clientIP”:String, “allowedIPs”:String, “message”:String} |
DELETE |
/client |
Delete a client |
{“publicKey”:String} |
|
PUT |
/client/enable |
Enable a client |
{“publicKey”:String} |
|
PUT |
/client/disable |
Disable a client |
{“publicKey”:String} |
1.2.8.4.2. Generate a WireGuard server private key
Using the WireGuard cli:
wg genkey
1.2.8.4.3. Create a VPN client
Generate the client keys (public, private and pre-shared) sending an HTTP GET request to the /keys endpoint.
curl --location --request GET 'http://<wg_api_IP_address>:<wg_api_port>/keys'
Response example:
{
  "public": "RfGgIjkPJC9U6b0OE8UHdnJwAA4hCV1FfQOX1/FaIzo=",
  "private": "YDhkBXyym+L255TwBGHWXXWcaMqaGqlJLLyc4XyyE18=",
  "preshared": "FIOSD2ErZISlHwFsBRK5RVyd7ENhvJ4x3W101BoewqQ="
}
Create a client in the API making an HTTP POST request to the /client endpoint, including the generated public and pre-shared keys in the request body.
curl --location --request POST '<wg_api_IP_address>:<wg_api_port>/client' \
    --header 'Content-Type: application/json' \
    --data-raw '{
        "publicKey": <client_public_key>,
        "presharedKey": <client_preshared_key>
    }'
Response example:
{
  "serverPublicKey": "iJT+CW4QoWNDIDo763CPx1TZ3x9bSNTN5t0uQbzo5jo=",
  "serverIP": "192.168.1.67",
  "serverPort": "51820",
  "clientIP": "192.168.2.56/32",
  "allowedIPs": "0.0.0.0/0",
  "message": "Peer added successfully"
}
Create the WireGuard client configuration file (.conf file extension) with the data obtained in the responses of the last two requests. A complete example filled with the responses of the last two example requests is provided, and, furtheremore, a configuration file template can be found in the next subsection.
[Interface]
PrivateKey = YDhkBXyym+L255TwBGHWXXWcaMqaGqlJLLyc4XyyE18=
Address = 192.168.2.56/32

[Peer]
PublicKey = iJT+CW4QoWNDIDo763CPx1TZ3x9bSNTN5t0uQbzo5jo=
PresharedKey = FIOSD2ErZISlHwFsBRK5RVyd7ENhvJ4x3W101BoewqQ=
AllowedIPs = 0.0.0.0/0
Endpoint = 192.168.1.67:51820
PersistentKeepalive = 25
Note
The AllowedIPs field must be filled by the user depending on the behaviour that expects from the VPN. A value of 0.0.0.0/0 will redirect all the traffic (including the internet) through the VPN, . Specifying a subnetwork (e.g. 10.1.243.0/24), only the traffic with a destination inside this subnetwork will be sent via the VPN.
Connect to the VPN using a WireGuard client program. The instructions are provided in the Connect to the VPN subsection.
1.2.8.4.4. Client configuration file template
[Interface]
PrivateKey = <wg_client_private_key>
Address = <wg_client_IP_address>

[Peer]
PublicKey = <wg_server_public_key>
PresharedKey = <wg_preshared_key>
AllowedIPs = <wg_allowed_IPs>
Endpoint = <wg_server_IP_address_or_DNS_name>:<wg_server_udp_port>
PersistentKeepalive = <number_of_seconds> (no mandatory)
1.2.8.4.5. Connect to the VPN
In Windows, use the TunSafe VPN client (https://tunsafe.com/):
Create the WireGuard configuration file
Import the configuration file
Connect to the VPN
In Linux, use the WireGuard cli.
Install WireGuard and WireGuard tools
Create the WireGuard configuration file
Create the WireGuard interface and connect to the VPN:
sudo wg-quick up <path_to_wg_config_file>
To disconnect:
sudo wg-quick down <path_to_wg_config_file>
1.2.8.5. Prerequisites
In Linux, set these sysctl values:
sysctl -w net.ipv4.ip_forward=1
sysctl -w net.ipv4.conf.all.src_valid_mark=1
Or edit these values in the /etc/sysctl.conf file.
1.2.8.6. Installation
The enabler can be installed using its Helm chart, which is publicly available in Artifact Hub.
Add the Helm chart repository:
helm repo add assist-iot-vpn helm repo add assist-iot-vpn https://assist-iot.github.io/vpn/vpn-artifactInstall the lastest version of the enabler:
helm install vpn-enabler assist-iot-vpn/vpn
1.2.8.7. Configuration options
The enabler can be configured using the following environment variables:
WG_PRIVATE_KEY: private key for the WireGuard server. To generate it, see the Generate a WireGuard server private key section.
API_PORT: TCP port where it is exposed the API.
SERVER_IP: public IP or DNS name of the machine where runs the VPN enabler.
WG_SUBNET: internal subnet of the WireGuard interface. The value must be the first IP of the subnet in CIDR format (<subnet_first_ip>/<subnet_mask_bits>, e.g., for the subnet 192.168.2.0/24, the value must be 192.168.2.1/24). This parameter is important because determines the maximum number of clients of the VPN. For the example subnet, the maximum number of clients will be 253.
WG_PORT: UDP port where it is exposed the WireGuard network interface.
PEER_ALLOWED_IPS: allowed subnets for the clients. A value of 0.0.0.0/0 will allow the clients to connect to every network via the VPN, including to the internet. Specifying a subnetwork (e.g. 10.1.243.0/24) the client will only be able to reach this subnetwork.
MONGODB_HOST: host of the MongoDB database.
MONGODB_PORT: port number of the MongoDB database.
MONGODB_USER: user of the MongoDB database.
MONGODB_PASS: password for the selected user of the MongoDB database.
LTSE: boolean value to use the LTSE or a MongoDB instance to store the VPN clients information.
LTSE_URL: URL of the LTSE enabler.
LTSE_INDEX: Elasticsearch index to store the VPN clients information.
1.2.8.8. Developer guide
1.2.8.8.1. Local code development
The source code is publicly available in GitHub.
Install WireGuard and WireGuard tools in the machine: https://www.wireguard.com/install/
Create a WireGuard network interface for testing. A configuration file example for creating the interfacecan be found at the section below.
In Linux, run the app as root or add sudo before all the wg commands to run the API without being containerized, e.g.:
utils/index.js, line 35: await exec(`wg ... --> await exec(`sudo wg ... )
Install the dependencies. Execute:
npm install
Run the enabler in development mode. Execute:
npm run server
1.2.8.8.2. WireGuard network interface configuration file
1.2.8.8.2.1. Template
[Interface]
Address = <wg_network_interface_IP_address>
PostUp = iptables -A FORWARD -i <wg_network_interface> -j ACCEPT; iptables -t nat -A POSTROUTING -o <host_network_interface> -j MASQUERADE
PostDown = iptables -D FORWARD -i <wg_network_interface> -j ACCEPT; iptables -t nat -D POSTROUTING -o <host_network_interface> -j MASQUERADE
ListenPort = <wg_udp_port>
PrivateKey = <wg_private_key>
Note
A possible feature to add in next releases is to bring new configurations and use cases for the VPN, or to improve the configuration possibilities of the VPN network.
1.2.8.8.2.2. Example: allow the client to redirect all the traffic through the VPN
[Interface]
Address = 192.168.2.1/24
PostUp = iptables -A FORWARD -i wg0 -j ACCEPT; iptables -t nat -A POSTROUTING -o ens18 -j MASQUERADE
PostDown = iptables -D FORWARD -i wg0 -j ACCEPT; iptables -t nat -D POSTROUTING -o ens18 -j MASQUERADE
ListenPort = 51820
PrivateKey = qAuVUEbmcI3ofLsjJmQ6+RtEejoNX+WHs7QOsIccn0Y=
1.2.8.8.2.3. Example: allow the client to only redirect the traffic to the configured local network (e.g. 10.0.0.0/24) - Basic
[Interface]
Address = 192.168.2.1/24
PostUp = iptables -I FORWARD -i wg0 -j DROP; iptables -I FORWARD -i wg0 -d 10.0.0.0/24 -j ACCEPT
PostDown = iptables -D FORWARD -i wg0 -j DROP; iptables -D FORWARD -i wg0 -d 10.0.0.0/24 -j ACCEPT
ListenPort = 51820
PrivateKey = qAuVUEbmcI3ofLsjJmQ6+RtEejoNX+WHs7QOsIccn0Y=
1.2.8.8.2.4. Example: allow the client to only redirect the traffic to the configured local network (e.g. 10.0.0.0/24) - Advanced
[Interface]
Address = 192.168.2.1/24
PreUp = iptables -t mangle -A PREROUTING -i wg0 -j MARK --set-mark 0x30
PreUp = iptables -t nat -A POSTROUTING ! -o wg0 -m mark --mark 0x30 -j MASQUERADE
PreUp = iptables -I FORWARD -i wg0 -j REJECT
PreUp = iptables -I FORWARD -i wg0 -d 10.0.0.0/24 -j ACCEPT
PostDown = iptables -t mangle -D PREROUTING -i wg0 -j MARK --set-mark 0x30
PostDown = iptables -t nat -D POSTROUTING ! -o wg0 -m mark --mark 0x30 -j MASQUERADE
PostDown = iptables -D FORWARD -i wg0 -j REJECT
PostDown = iptables -D FORWARD -i wg0 -d 10.0.0.0/24 -j ACCEPT
ListenPort = 51820
PrivateKey = qAuVUEbmcI3ofLsjJmQ6+RtEejoNX+WHs7QOsIccn0Y=
1.2.8.8.2.5. Example: allow the client to only redirect the traffic to the VPN network
[Interface]
Address = 192.168.2.1/24
PostUp = iptables -I FORWARD -i wg0 -j DROP;
PostDown = iptables -I FORWARD -i wg0 -j DROP;
ListenPort = 51820
PrivateKey = qAuVUEbmcI3ofLsjJmQ6+RtEejoNX+WHs7QOsIccn0Y=
1.2.8.9. Version control and release
Version 1.1.0. Improvements and new functionalities will be added in future versions.
1.2.8.10. License
This software is licensed under the Apache 2.0 license.
1.2.8.11. Notice (dependencies)
ASSIST-IoT - Architecture for Scalable, Self-*, human-centric, Intelligent, Se-cure, and Tactile next generation IoT
This project has received funding from the European Union’s Horizon 2020 research and innovation programme under grant agreement No 957258.
VPN enabler
Copyright 2020-2023 Universitat Politècnica de València
Included Software
Wireguard (https://www.wireguard.com/), GPLv2 license
Used Software
types/node (https://github.com/DefinitelyTyped/DefinitelyTyped), MIT license
types/webidl-conversions (https://github.com/DefinitelyTyped/DefinitelyTyped), MIT license
types/whatwg-url (https://github.com/DefinitelyTyped/DefinitelyTyped), MIT license
accepts 1.3.7 (https://github.com/jshttp/accepts), MIT license
array-flatten 1.1.1 (https://github.com/blakeembrey/array-flatten), MIT license
base64-js 1.5.1 (https://github.com/beatgammit/base64-js), MIT license
body-parser 1.19.0 (https://github.com/expressjs/body-parser), MIT license
bson 4.5.3 (https://github.com/mongodb/js-bson), Apache-2.0 license
buffer 5.7.1 (https://github.com/feross/buffer), MIT license
bytes 3.1.0 (https://github.com/visionmedia/bytes.js), MIT license
content-disposition 0.5.3 (https://github.com/jshttp/content-disposition), MIT license
content-type 1.0.4 (https://github.com/jshttp/content-type), MIT license
cookie-signature 1.0.6 (https://github.com/visionmedia/node-cookie-signature), MIT license
cookie 0.4.0 (https://github.com/jshttp/cookie), MIT license
debug 2.6.9 (https://github.com/visionmedia/debug), MIT license
denque 2.0.1 (https://github.com/invertase/denque), Apache-2.0 license
depd 1.1.2 (https://github.com/dougwilson/nodejs-depd), MIT license
destroy 1.0.4 (https://github.com/stream-utils/destroy), MIT license
ee-first 1.1.1 (https://github.com/jonathanong/ee-first), MIT license
encodeurl 1.0.2 (https://github.com/pillarjs/encodeurl), MIT license
escape-html 1.0.3 (https://github.com/component/escape-html), MIT license
etag 1.8.1 (https://github.com/jshttp/etag), MIT license
express 4.17.1 (https://github.com/expressjs/express), MIT license
finalhandler 1.1.2 (https://github.com/pillarjs/finalhandler), MIT license
forwarded 0.2.0 (https://github.com/jshttp/forwarded), MIT license
fresh 0.5.2 (https://github.com/jshttp/fresh), MIT license
http-errors 1.7.2 (https://github.com/jshttp/http-errors), MIT license
iconv-lite 0.4.24 (https://github.com/ashtuchkin/iconv-lite), MIT license
ieee754 1.2.1 (https://github.com/feross/ieee754), BSD-3-Clause license
inherits 2.0.3 (https://github.com/isaacs/inherits), ISC license
ipaddr.js 1.9.1 (https://github.com/whitequark/ipaddr.js), MIT license
media-typer 0.3.0 (https://github.com/jshttp/media-typer), MIT license
memory-pager 1.5.0 (https://github.com/mafintosh/memory-pager), MIT license
merge-descriptors 1.0.1 (https://github.com/component/merge-descriptors), MIT license
methods 1.1.2 (https://github.com/jshttp/methods), MIT license
mime-db 1.50.0 (https://github.com/jshttp/mime-db), MIT license
mime-types 2.1.33 (https://github.com/jshttp/mime-types), MIT license
mime 1.6.0 (https://github.com/broofa/node-mime), MIT license
mongodb-connection-string-url 2.1.0 (https://github.com/mongodb-js/mongodb-connection-string-url), Apache-2.0 license
mongodb 4.1.3 (https://github.com/mongodb/node-mongodb-native), Apache-2.0 license
ms 2.0.0 (https://github.com/zeit/ms), MIT license
ms 2.1.1 (https://github.com/zeit/ms), MIT license
negotiator 0.6.2 (https://github.com/jshttp/negotiator), MIT license
netmask 2.0.2 (https://github.com/rs/node-netmask), MIT license
on-finished 2.3.0 (https://github.com/jshttp/on-finished), MIT license
parseurl 1.3.3 (https://github.com/pillarjs/parseurl), MIT license
path-to-regexp 0.1.7 (https://github.com/component/path-to-regexp), MIT license
proxy-addr 2.0.7 (https://github.com/jshttp/proxy-addr), MIT license
punycode 2.1.1 (https://github.com/bestiejs/punycode.js), MIT license
qs 6.7.0 (https://github.com/ljharb/qs), BSD-3-Clause license
range-parser 1.2.1 (https://github.com/jshttp/range-parser), MIT license
raw-body 2.4.0 (https://github.com/stream-utils/raw-body), MIT license
safe-buffer 5.1.2 (https://github.com/feross/safe-buffer), MIT license
safer-buffer 2.1.2 (https://github.com/ChALkeR/safer-buffer), MIT license
saslprep 1.0.3 (https://github.com/reklatsmasters/saslprep), MIT license
send 0.17.1 (https://github.com/pillarjs/send), MIT license
serve-static 1.14.1 (https://github.com/expressjs/serve-static), MIT license
setprototypeof 1.1.1 (https://github.com/wesleytodd/setprototypeof), ISC license
sparse-bitfield 3.0.3 (https://github.com/mafintosh/sparse-bitfield), MIT license
statuses 1.5.0 (https://github.com/jshttp/statuses), MIT license
toidentifier 1.0.0 (https://github.com/component/toidentifier), MIT license
tr46 2.1.0 (https://github.com/jsdom/tr46), MIT license
type-is 1.6.18 (https://github.com/jshttp/type-is), MIT license
unpipe 1.0.0 (https://github.com/stream-utils/unpipe), MIT license
utils-merge 1.0.1 (https://github.com/jaredhanson/utils-merge), MIT license
vary 1.1.2 (https://github.com/jshttp/vary), MIT license
webidl-conversions 6.1.0 (https://github.com/jsdom/webidl-conversions), BSD-2-Clause license
whatwg-url 9.1.0 (https://github.com/jsdom/whatwg-url), MIT license
List of licenses
GPLv2 license (https://www.gnu.org/licenses/old-licenses/gpl-2.0.html)
Apache-2.0 license (https://www.apache.org/licenses/LICENSE-2.0)
MIT license (https://opensource.org/licenses/MIT)
ISC license (https://opensource.org/licenses/ISC)
BSD-3-Clause license (https://opensource.org/licenses/BSD-3-Clause)
BSD-2-Clause license (https://opensource.org/licenses/BSD-2-Clause)